Slips and falls are the most common workplace accidents you’d want to avoid if you are working at a restaurant, hospital, or in construction. Even the cleanest floor can be slippery and might lead to an accident if you aren’t wearing a pair of non-slip shoes.
During my first job as a waitress, I wore a pair of Converse on my first day and ended up slipping on a wet floor and hurting my back. It was embarrassing.
I didn’t know what shoes were non-slip nor did I have enough money to get a new pair. So I asked my colleagues who worked in a similar slippery setting, especially other restaurant workers, chefs, bartenders and construction workers if they had any idea how to make shoes non-slip.
After collecting all the recommendations and testing them out, I’ve curated this list of the 7 best ways to make your shoes non-slip:
1. Scuff the soles
Remember when you scuffed your brand new flashy and flawless Zippo to make it look more classic and easier to grip? This works almost the same with non-slip shoes.
Non-slip shoes are nice with smooth outer and sole but they are not meant to be used on slippery surfaces. If you want to wear your regular, non-slip shoes at work, you can scuff the soles to add more traction and grip.
Scuffing the soles is also easy – you just need to find an abrasive surface like rough concrete or gravel and rub your shoes’ bottom on it.
Take it easy and do it gently. You don’t want to damage your shoes and scuff the sole too much until it is very thin. You might also tear your sole completely if you scuff too much so take precautions.
Keep scuffing the sole till you can feel a little roughness on the surface. A little is enough. You will certainly notice a difference and get a better grip when you walk around!
You can also use sandpaper to roughen up the bottoms of your shoes. You can also use a nail file instead. Spend more time on areas that make contact with the pavement until you get the right traction.
2. Use traction spray or hairspray
Shoe adhesive sprays can also help to make your shoes winter-proof and slip-resistant! Spray-on traction adhesives can provide a good coating and enough protection against slippery surfaces.
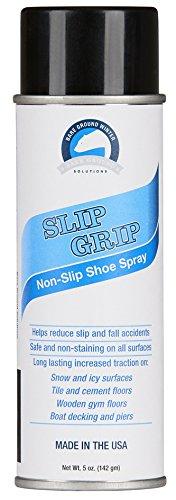
This traction spray from Bare Ground does a great job at providing additional traction without harming the leather or rubber.
Direct your nozzle at the targeted area in your shoes and apply the spray gently without waste.
Let it dry and you’re good to go.
This spray is great for both indoor and outdoor surfaces, whether it be tile or wooden floors.
If you do not have a bottle of traction spray in your garage, you could also use your hairspray as a temporary solution. While hairspray is not a long-term solution, it can help make your smooth soles slip-proof for a while.
Although hairspray is a super temporary solution, it is an alternative to spray-on traction adhesives that will make shoes with smooth soles a little more slip-proof.
Spray a good amount on the sole and let it dry before you step outside. Make sure you don’t use a colored spray or your shoes may end up looking weird with unmatched colors.
3. Use non-slip soles or pads
Another solution to make your pair of shoes slip-resistant is to reinforce them with non-slip or slip-resistant soles.
Unlike scuffing your soles to roughen the surface, adding a non-slip pad to your sole is a better and long-lasting solution. After all, these pads are designed and manufactured to provide additional grip and you aren’t required to do any additional work.
On top of that, if you are required to walk daily on slippery surfaces, you do not need to worry about spraying or scuffing your soles time and again.
These non-slip pads can also last for months and provide additional life to your shoes.
4. Score the soles
Scoring to create treads in the sole is another great way to add more traction to your shoes and make them slip-resistant.
You can use a nail file or knife to gently score the sole by cutting short and little deep lines. Make sure to not use extra force as you might tear and penetrate the sole.
Remember, you’re trying to get your sole to look similar to a tire surface by scoring. Try to create patterns so you have better treads for better traction.
5. Use a mixture of rubber glue and salt
If you’re looking for an at-home, temporary solution to make your shoes non-slip, just mix together some rubber glue and salt to create a non-slip coating. The glue will act as an adhesive, while the salt will provide traction.
Simply apply the mixture to the bottom of your shoes and let it dry. You’ll be able to walk with confidence, knowing that your shoes won’t slip out from under you.
And if you ever need to remove the coating, simply soak your shoes in vinegar for a few minutes. The non-slip coating will come right off, leaving your shoes as good as new.
6. Use ice grips
Winter can be a treacherous time for anyone, particularly if you have to frequently navigate icy sidewalks and slippery steps.

If you live in an area where ice and snow are common, you may want to invest in a pair of ice grips.
These attach to the bottom of your shoes and provide extra traction, helping to prevent slips and falls.
They’re easy to use and can be put on any type of shoe, making them a great option for winter weather. Best of all, they’re relatively inexpensive, so there’s no excuse not to be safe this winter.
7. Use Puff Paint
Puff paint is generally used to decorate clothing and other textiles. But it can also be used to make shoes non-slip. It works by creating a textured surface on the fabric that helps to add traction and prevent slipping.
Simply apply the paint to the bottom of the shoe in a thin layer and allow the paint to dry completely. Voila! You just made your shoes non-slip.
Puff paint is also available in a variety of colors, so you can choose a color that matches your shoes or goes with your outfit. It is also durable, so it will withstand wear and tear.
Plus, it’s easy to apply and can be washed off easily if you change your mind.